源码解析 之 xml布局时如何生成view

这篇文章主要解决一个疑惑 “layout目录下XML文件是如何转化为View对象”。
源码阅读不应该是味如嚼蜡,带着问题去刨根问底可能会发现不同的世界。
整篇文章较长,总共分为5个小结,如果你能完整地阅读完这5节并仔细琢磨其细节,相信必定会有很大收获。如有错误之处,望指出

  • XML to View之日常
  • 读懂LayoutInflater并不难
  • 寻找XML解析入口是关键
  • 递归解析子节点
  • 反射标签View初现

你的任何问题,都可以在源码中得到答案,只是你愿不愿意而已。

XML to Vieww之日常

下面为加载view的一种实现,对绝大多数Android工程师而言绝不陌生。

1
2
LayoutInflater layoutInflater = LayoutInflater.from(context);
View layout = layoutInflater.inflate(R.layout.layout, parent, false);

平时我们覆盖Activity#setContentView的时候,你可能留意过:

1
2
3
4
5
Activity.java
public void setContentView(@LayoutRes int layoutResID) {
getWindow().setContentView(layoutResID);
initWindowDecorActionBar();
}

如果处于好奇心的驱使,对getWindow().setContentView(layoutResID)一探究竟,那下面的代码你可能会见过。

1
2
3
4
5
6
7
8
9
10
11
12
13
14
PhoneWindow.java
@Override
public void setContentView(int layoutResID) {
//...
if (hasFeature(FEATURE_CONTENT_TRANSITIONS)) {
final Scene newScene = Scene.getSceneForLayout(mContentParent, layoutResID,
getContext());
transitionTo(newScene);
} else {
//重点看这里
mLayoutInflater.inflate(layoutResID, mContentParent);
}
//...
}

如果你不了解PhoneWindow,或者除inflate方法外都不了解。没有关系,我们只解决当前的问题。从我们接触的代码中至少可以发现LayoutInflater就是帮助我们把xml转化为view的中介。事实上它就是扮演这样的角色。

小结: 通过LayoutInflater#inflate可加载layout布局生成View对象

读懂LayoutInflater并不难

注释帮你读懂一个类,api教你使用一个类,摘了句核心的注释语句:

1
2
3
4
5
6
7
8
1. Instantiates a layout XML file into its corresponding {@link android.view.View} objects.
XML文件转化为对应的View对象。

2. use {@link android.app.Activity#getLayoutInflater()} or {@link Context#getSystemService} to retrieve a standard LayoutInflater.
使用注释中两个方法可以获取一个标准的LayoutInflater。

3. To create a new LayoutInflater with an additional {@link Factory} for your own views, you can use {@link #cloneInContext} to clone an existing ViewFactory, and then call {@link #setFactory} on it to include your Factory.
为了创建带有自定义Factory的LayoutInflater对象,你可以克隆一个当前已存在的ViewFactory并通过调用setFactory来设置自己的Factory对象。

LayoutInflater干什么大概了解了,怎么获取也知道了,第三条Factroy是什么概念?根据注释可以猜测,可能是用于生产View的工厂。要产生Android大量的widget对象,这种模式再适合不过。

小结: 通过获取标准的LayoutInflater对象我们可以将XML文件转化为对应的View对象,并且可能可以通过自定义Factory来控制生成View的逻辑。

寻找XML解析入口是关键

除了注释,可以利用Ctrl+12(AS快捷)来查看方法。LayoutInflater有许多方案,有Factroy相关的方法,还有我们熟悉的inflate方法,先看看inflate方法。

1
2
3
4
5
6
7
8
9
10
11
12
13
14
15
16
17
18
19
20
LayoutInflater.java
// 1.
public View inflate(@LayoutRes int resource, @Nullable ViewGroup root) {
return inflate(resource, root, root != null);
}
// 2.
public View inflate(XmlPullParser parser, @Nullable ViewGroup root) {
return inflate(parser, root, root != null);
}
// 3.
public View inflate(@LayoutRes int resource, @Nullable ViewGroup root, boolean attachToRoot) {
final Resources res = getContext().getResources();
//...
final XmlResourceParser parser = res.getLayout(resource);
try {
return inflate(parser, root, attachToRoot);
} finally {
parser.close();
}
}

源码中一共有四个inflate方法,上述显示前三个方法。1处调用3处的方法,先获取Resources对象,再获取XmlResourceParser对象,最终调用2处方法,而2处方法中调用的是第四个方法。摘取了核心的注释及逻辑。

1
2
3
4
5
6
7
8
9
10
11
12
13
14
15
16
17
18
19
20
21
22
23
24
25
26
27
28
29
30
31
32
33
34
35
36
37
38
39
40
41
42
43
44
45
46
47
48
49
50
51
52
53
54
55
56
57
58
59
60
61
62
63
64
65
66
67
68
69
70
71
72
73
74
75
76
77
78
79
80
81
82
LayoutInflater.java
/**
* Inflate a new view hierarchy from the specified XML node.
* 从特定的XML节点中解析View对象
* For performance reasons, view inflation relies heavily on pre-processing of
* XML files that is done at build time. Therefore, it is not currently possible
* touse LayoutInflater with an XmlPullParser over a plain XML file at runtime.
* 为了提升性能,需要对XML文件做预处理
*/
public View inflate(XmlPullParser parser, @Nullable ViewGroup root, boolean attachToRoot) {
synchronized (mConstructorArgs) {

final Context inflaterContext = mContext;

//1. 获取xml布局属性,如wigth height等
final AttributeSet attrs = Xml.asAttributeSet(parser);
Context lastContext = (Context) mConstructorArgs[0];
mConstructorArgs[0] = inflaterContext;
View result = root;
//...
// 2. 查找根节点
int type;
while ((type = parser.next()) != XmlPullParser.START_TAG &&
type != XmlPullParser.END_DOCUMENT) {
// Empty
}

// 3. 如果不是根节点不是START_TAG
if (type != XmlPullParser.START_TAG) {
throw new InflateException(parser.getPositionDescription()
+ ": No start tag found!");
}
final String name = parser.getName();

// 4. 如果是Merge标签
if (TAG_MERGE.equals(name)) {
if (root == null || !attachToRoot) {
throw new InflateException("<merge /> can be used only with a valid "
+ "ViewGroup root and attachToRoot=true");
}
rInflate(parser, root, inflaterContext, attrs, false);
} else {

// 5. 找到根节点View
final View temp = createViewFromTag(root, name, inflaterContext, attrs);
ViewGroup.LayoutParams params = null;
if (root != null) {

// 5. 根据AttributeSet生成layout params
params = root.generateLayoutParams(attrs);
if (!attachToRoot) {
// Set the layout params for temp if we are not
// attaching. (If we are, we use addView, below)
temp.setLayoutParams(params);
}
}

// 6. inflate所有子节点
rInflateChildren(parser, temp, attrs, true);


// 7. 如果满足附着条件,则添加根节点View
if (root != null && attachToRoot) {
root.addView(temp, params);
}

// 8. 如果父容器为空或者不附着在父容器,则返回根节点View。反之,则返回父容器
if (root == null || !attachToRoot) {
result = temp;
}
}

} catch (XmlPullParserException e) {
//...
} catch (Exception e) {
//...
} finally {
//...
}
return result;
}
}

梳理下上述逻辑,可以得到以下大致的流程:

  • 先解析XML文件中的Attribute属性,保存在属性集
  • 遍历查找到第一个根节点。如果是<merge>,则把父容器作为父布局参数。反之,获取到根view,则把根view作为父布局参数,走rInflateChildren逻辑。
  • 根据父容器不为是否为空和是否需要附着在父容器来返回不同结果。

基于上述解析第一个根节点的逻辑基础上可以猜测:rInflateChildren的处理逻辑应该是递归处理根节点下的节点树并解析成对应的View树,放父布局中。

小结: inflate方法解析出根节点并根据根节点的类型设置不同的父布局,剩余子节点树递归解析成View树添加到父布局中

递归解析子节点

无论根节点是否是<merge>,最终都会调用rInflate方法,只是<merge>不作为子View树的父容器,而是使用其上层的ViewGroup作为容器。

1
2
3
4
5
6
7
8
9
10
11
12
13
14
15
16
17
18
19
20
21
22
23
24
25
26
27
28
29
30
31
32
33
34
35
36
37
38
39
40
41
42
43
44
45
46
47
48
49
50
51
52
53
54
55
56
57
58
59
60
61
62
63
64
65
LayoutInflater.java
//1. 本质还是调用rInflate
final void rInflateChildren(XmlPullParser parser, View parent, AttributeSet attrs,
boolean finishInflate) throws XmlPullParserException, IOException {
rInflate(parser, parent, parent.getContext(), attrs, finishInflate);
}

/**
* Recursive method used to descend down the xml hierarchy and instantiate
* views, instantiate their children, and then call onFinishInflate().
* 递归解析xml结构并实例化View对象,最后调用onFinishInflate方法
*/
void rInflate(XmlPullParser parser, View parent, Context context,
AttributeSet attrs, boolean finishInflate) throws XmlPullParserException, IOException {

//2. 获取当前元素的高度。除了根元素(定义为0)外,每检索到一个start tag标志则递增1
final int depth = parser.getDepth();
int type;

//3. 内层元素且非结束符号
while (((type = parser.next()) != XmlPullParser.END_TAG ||
parser.getDepth() > depth) && type != XmlPullParser.END_DOCUMENT) {

//4. 如果不是start tag,则调过,直到检索到start tag
if (type != XmlPullParser.START_TAG) {
continue;
}
final String name = parser.getName();

//5. 如果是requestFocus标签
if (TAG_REQUEST_FOCUS.equals(name)) {
parseRequestFocus(parser, parent);

//6. 如果是tag标签
} else if (TAG_TAG.equals(name)) {
parseViewTag(parser, parent, attrs);

//7. 如果是include标签
} else if (TAG_INCLUDE.equals(name)) {
if (parser.getDepth() == 0) {
throw new InflateException("<include /> cannot be the root element");
}
parseInclude(parser, context, parent, attrs);

//8. 如果是merge标签
} else if (TAG_MERGE.equals(name)) {
throw new InflateException("<merge /> must be the root element");

//9. 其他标签,比如TextView或者LinearLayout等
} else {
final View view = createViewFromTag(parent, name, context, attrs);
final ViewGroup viewGroup = (ViewGroup) parent;
final ViewGroup.LayoutParams params = viewGroup.generateLayoutParams(attrs);

//10. 递归处理子布局
rInflateChildren(parser, view, attrs, true);
viewGroup.addView(view, params);
}
}

//11. 是否回调onFinishInFlate
if (finishInflate) {
parent.onFinishInflate();
}
}

1处表明,rInflateChildren函数本质上是调用rInflate函数处理,只是区分语境而做了不同命名而已。
5-7处解析处理特殊标签,这里不做详细解析,感兴趣的童鞋可以直接阅读源码。
2-11处为rInflate函数的主要逻辑,也是递归解析的关键所在。写一个递归函数,核心是理解递归的终止及触发条件,举个栗子。

1
2
3
4
5
6
7
8
9
10
11
12
13
<?xml version="1.0" encoding="utf-8"?>  <!-- depth=0 -->
<LinearLayout> <!-- depth=1 -->

<TextView> <!-- depth=2 -->
</TextView> <!-- depth=2 -->

<LinearLayout> <!-- depth=2 -->

<TextView/> <!-- depth=3 -->

</LinearLayout> <!-- depth=2 -->

</LinearLayout> <!-- depth=1 -->

针对这个栗子,我只说关键的逻辑说明,在递归子节点树的时候实际上外层已经解析过了,这里只是演示下XmlPullParser的大致解析逻辑。

  1. 第一次调用rInflate函数,depth=0,解析第一个<LinearLayout>
    START_TAG,实例化LinearLayout对象L1,触发第一次递归
  2. depth=1,解析到第一个<TextView>,为START_TAG,实例化TextView对象,并把自己添加到L1,触发第二次递归
  3. depth=2,解析到第一个</TextView>,为END_TAG不满足while条件,结束第二次递归
  4. 回到第一次递归while循环,depth=2,解析第一个<LinearLayout>,为START_TAG,实例化LinearLayout对象L2,触发第三次递归
  5. depth=2,解析到<TextView/>,实际上这种写法等同于第一个TextView,对于解析器而言,都是按照START_TAG -> TEXT -> END_TAG的解析逻辑。解析到第二个TextView,并把自己添加到L2,触发第四次递归
  6. depth=3,不满足while条件,结束第四次递归
  7. depth=2,解析到第一个</LinearLayout>,为END_TAG不满足while条件,结束第三次递归
  8. depth=1,解析到第二个</LinearLayout>,为END_TAG不满足while条件,结束第一次递归

上述的栗子基本走了一遍rInflate函数的逻辑。而递归的逻辑可能有点绕,不过理解起来并不困难。相信有心看到这里的童鞋都比较聪明哈。在整个递归过程中,我们又多了一个问题,递归中怎么创建View的呢?没错,,就是9处的createViewFromTag,不急,走完这步先小结。

小结: 递归解析的流程从XML文件次层开始向内解析节点树,间接调用rInflate函数递归检索所有节点并把符合转化为View的节点转化为View对象

反射标签View初现

继续上一节的逻辑,可以通过createViewFromTag的方法的把Tag转化为View。还是相信,代码会帮你解除所有疑惑。

1
2
3
4
LayoutInflater.java
final String name = parser.getName();
//...
final View view = createViewFromTag(parent, name, context, attrs);

name即获取当前节点的名称,比如<TextView>获取的是TextView

1
2
3
4
5
6
7
8
9
10
11
12
13
14
15
16
17
18
19
20
21
22
23
24
25
26
27
28
29
30
31
32
33
34
35
36
37
38
39
40
41
42
43
44
45
46
47
48
49
50
51
52
53
54
55
56
57
58
59
60
61
62
63
64
65
66
67
68
69
70
71
72
73
74
//1. 默认是ignoreThemeAttr为false
private View createViewFromTag(View parent, String name, Context context, AttributeSet attrs) {
return createViewFromTag(parent, name, context, attrs, false);
}

View createViewFromTag(View parent, String name, Context context, AttributeSet attrs,
boolean ignoreThemeAttr) {

//2. 提取class属性,并把class的值作为tag名
//WTF?还有这种操作,也就是意味着,view标签可以随便变成
//任意一个标签,比如说LinearLayout,RelativeLayout等
if (name.equals("view")) {
name = attrs.getAttributeValue(null, "class");
}

// 3.如果采用主题配置属性,则构建一个ContextThemeWrapper
if (!ignoreThemeAttr) {
final TypedArray ta = context.obtainStyledAttributes(attrs, ATTRS_THEME);
final int themeResId = ta.getResourceId(0, 0);
if (themeResId != 0) {
context = new ContextThemeWrapper(context, themeResId);
}
ta.recycle();
}

// 4. what?如果是blink,则构建BlinkLayout
if (name.equals(TAG_1995)) {
// Let's party like it's 1995!
return new BlinkLayout(context, attrs);
}

// 5. 典型工厂构建。wait,这里的factory不正是在介绍的LayoutInflater时涉及到的Factory吗?
try {
View view;

// 6.优先通过mFactory2处理,再通过mFacotry处理
if (mFactory2 != null) {
view = mFactory2.onCreateView(parent, name, context, attrs);
} else if (mFactory != null) {
view = mFactory.onCreateView(name, context, attrs);
} else {
view = null;
}

// 7.如果上述工厂都无法生成View,则使用私有工厂处理
if (view == null && mPrivateFactory != null) {
view = mPrivateFactory.onCreateView(parent, name, context, attrs);
}

// 8.如果私有工厂都处理不了,那只能通过默认手段
// createView(onCreateView调用createView实现)
if (view == null) {
final Object lastContext = mConstructorArgs[0];
mConstructorArgs[0] = context;
try {
if (-1 == name.indexOf('.')) {
view = onCreateView(parent, name, attrs);
} else {
view = createView(name, null, attrs);
}
} finally {
mConstructorArgs[0] = lastContext;
}
}

return view;
} catch (InflateException e) {
//...
} catch (ClassNotFoundException e) {
//...
} catch (Exception e) {
//...
}
}

上述代码的逻辑大致是:

  1. name转化。如果name是View,则需要转化为对应class属性的值;
  2. name转成View。如果name是blink,则直接构建BlinkLayout并返回,否则先让工厂生成,如果工厂都生成不了,则使用默认生成。
    既然mFactorymFactory2mPrivateFactory是优先构建View对象,所以有必要了解这些是什么。
1
2
3
4
5
6
7
8
9
10
11
12
13
14
15
16
17
18
19
20
LayoutInflater.java
//1. mFactory
public interface Factory {
/**
* Hook you can supply that is called when inflating from a LayoutInflater.
* You can use this to customize the tag names available in your XML
* layout files.
*/
public View onCreateView(String name, Context context, AttributeSet attrs);
}

//2. mFactory2,mPrivateFactory
public interface Factory2 extends Factory {
/**
* Version of {@link #onCreateView(String, Context, AttributeSet)}
* that also supplies the parent that the view created view will be
* placed in.
*/
public View onCreateView(View parent, String name, Context context, AttributeSet attrs);
}

实际上只是一个暴露构建View方法的接口,而接口对象赋值是在构造器内和set方法中。LayoutInflater是一个抽象类,所以先检查其实现类。
通过源码的引用检索,可以发现,实现继承LayoutInflater的类一共有两个个

1
2
3
android源码类
AsyncLayoutInflater.java的私有静态内部类BasicInflater
PhoneLayoutInflater

其中PhoneLayoutInflater为android系统默认实现的LayoutInflater对象,也就是我们经常获取的LayoutInflater对象啦。

1
2
3
4
5
6
7
8
9
10
11
12
13
PhoneLayoutInflater.java

public PhoneLayoutInflater(Context context) {
super(context);
}

protected PhoneLayoutInflater(LayoutInflater original, Context newContext) {
super(original, newContext);
}
//1. 外部调用
public LayoutInflater cloneInContext(Context newContext) {
return new PhoneLayoutInflater(this, newContext);
}

实际上只有1处被外部调用,通过检索有多出引用。其中有一处引用比较有趣是在Activity,看看就散了哈。

1
2
3
4
5
6
7
8
9
     @Override
public LayoutInflater onGetLayoutInflater() {
//1. 最终调用window层的layoutInfalter,这里不多做解析
final LayoutInflater result = Activity.this.getLayoutInflater();
if (onUseFragmentManagerInflaterFactory()) {
return result.cloneInContext(Activity.this);
}
return result;
}

既然实现类没有处理Factory,只能看setFactorysetFactory2方法

1
2
3
4
5
6
7
8
9
10
11
12
13
14
15
16
17
18
19
20
21
22
23
24
25
26
27
28
29
30
31
32
33
34
35
36
37
38
39
40
41
42
43
44
45
46
47
48
49
50
51
52
53
54
55
56
57
58
59
60
61
62
63
64
65
66
67
68
69
70
71
72
73
74
75
76
77
78
79
80
81
82
83
84
85
86
87
88
89
90
91
LayoutInflater.java
/**
* Attach a custom Factory interface for creating views while using
* this LayoutInflater. This must not be null, and can only be set once;
* after setting, you can not change the factory. This is
* called on each element name as the xml is parsed. If the factory returns
* a View, that is added to the hierarchy. If it returns null, the next
* factory default {@link #onCreateView} method is called.
*
* <p>If you have an existing
* LayoutInflater and want to add your own factory to it, use
* {@link #cloneInContext} to clone the existing instance and then you
* can use this function (once) on the returned new instance. This will
* merge your own factory with whatever factory the original instance is
* using.
*/
public void setFactory(Factory factory) {
//1. 保证无法重复setFactory
if (mFactorySet) {
throw new IllegalStateException("A factory has already been set on this LayoutInflater");
}

//2. 保证factory不能为null
if (factory == null) {
throw new NullPointerException("Given factory can not be null");
}

//3. 设置mFactory
mFactorySet = true;
if (mFactory == null) {
mFactory = factory;
} else {
mFactory = new FactoryMerger(factory, null, mFactory, mFactory2);
}
}

public void setFactory2(Factory2 factory) {
if (mFactorySet) {
throw new IllegalStateException("A factory has already been set on this LayoutInflater");
}
if (factory == null) {
throw new NullPointerException("Given factory can not be null");
}

//4. 设置mFactory和mFactory
mFactorySet = true;
if (mFactory == null) {
mFactory = mFactory2 = factory;
} else {

mFactory = mFactory2 = new FactoryMerger(factory, factory, mFactory, mFactory2);
}
}

/**
* @hide for use by framework
*/
public void setPrivateFactory(Factory2 factory) {
if (mPrivateFactory == null) {
mPrivateFactory = factory;
} else {
mPrivateFactory = new FactoryMerger(factory, factory, mPrivateFactory, mPrivateFactory);
}
}

//5. factory合并
private static class FactoryMerger implements Factory2 {
private final Factory mF1, mF2;
private final Factory2 mF12, mF22;

FactoryMerger(Factory f1, Factory2 f12, Factory f2, Factory2 f22) {
mF1 = f1;
mF2 = f2;
mF12 = f12;
mF22 = f22;
}

public View onCreateView(String name, Context context, AttributeSet attrs) {
View v = mF1.onCreateView(name, context, attrs);
if (v != null) return v;
return mF2.onCreateView(name, context, attrs);
}

public View onCreateView(View parent, String name, Context context, AttributeSet attrs) {
View v = mF12 != null ? mF12.onCreateView(parent, name, context, attrs)
: mF1.onCreateView(name, context, attrs);
if (v != null) return v;
return mF22 != null ? mF22.onCreateView(parent, name, context, attrs)
: mF2.onCreateView(name, context, attrs);
}
}

上述的注释非常重要,Factory工厂不能为空且只能设置一次。从1-4处也可知两个set方法的调用是互斥的。如果开发者希望设置自定义的工厂,则需要从原来的LayoutInflater中复制一个对象,然后调用setFactory或者setFactory2方法设置解析工厂。另外setPrivateFactory是系统底层调用的,所以不开放对外设置。
那么setFactory或者setFactory2在android中如何设置的呢?通过AS的检索功能,显示如图,这些类可在v4包中查阅到。

setFactory
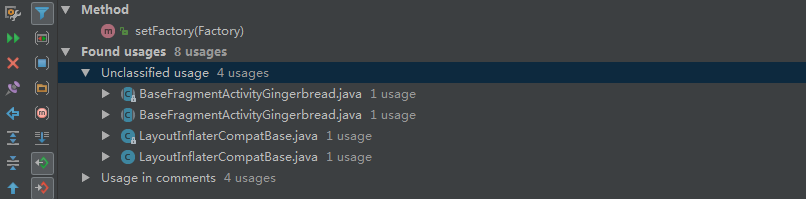
setFactory的调用来自于BaseFragmentActivityGingerbread.javaLayoutInflaterCompatBase.java

  • BaseFragmentActivityGingerbread.java处理低于3.0版本的activity版本都需要设置解析fragmen标签
  • LayoutInflaterCompatBase.java,则暴露FactoryWrapper分装类,根据不同的版本实现不同的LayoutInflaterFactory。常规的业务比如换肤,即可在这里实现自己的Factory达到View换肤效果。

setFactory2
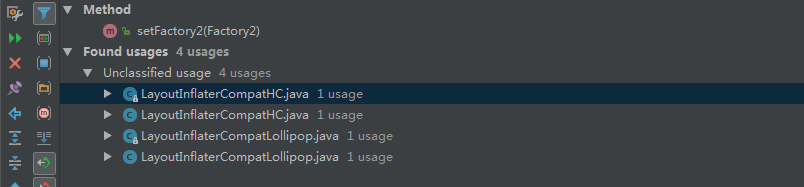
setFactory2的调用来自于LayoutInflaterCompatHC.javaLayoutInflaterCompatLollipop!因此我们有理由相信,HC版本(3.0)和Loolopop版本(5.0)必定需要兼容解析一些布局,哪些呢?2333,自己想想。其中LayoutInflaterCompatHC.java实际上内部实现了一个静态的FactoryWrapperHC类,该类继承1-2中的FactoryWrapper类,用来提供HC版本的Factory而已。对于LayoutInflaterCompatLollipop,基本逻辑也是如此。

花了挺长的篇幅讲了Factory相关的逻辑。到这里,大致能明白,实际上Factory大致就是一种拦截思想。优先通过选择自定义Factory来构建View对象。那么如果这些Factory都没有的话,则需要走默认逻辑,即LayoutInflater#createView

1
2
3
4
5
6
7
8
9
10
11
12
13
14
15
16
17
18
19
20
21
22
23
24
25
26
27
28
29
30
31
32
33
34
35
36
37
38
39
40
41
42
43
44
45
46
47
48
49
50
51
52
53
54
55
56
57
58
59
60
61
62
63
64
65
66
67
68
69
70
71
72
73
74
75
76
77
78
79
80
81
82
83
84
85
86
87
88
89
90
 /**
* Low-level function for instantiating a view by name. This attempts to
* instantiate a view class of the given <var>name</var> found in this
* LayoutInflater's ClassLoader.
*
* 通过Tag名称来反射构建View对象
*/
public final View createView(String name, String prefix, AttributeSet attrs)
throws ClassNotFoundException, InflateException {

//1. 内存缓存构造器,通过tag名唯一指定构造器
Constructor<? extends View> constructor = sConstructorMap.get(name);

//2. 这里你可能会有疑惑,需要verifyClassLoader的辅助判断是因为有可能出现相同包名
//但是不同的类的情况(插件加载),所需还需要ClassLoader辅助判断才能唯一识别一个构建起
if (constructor != null && !verifyClassLoader(constructor)) {
constructor = null;
sConstructorMap.remove(name);
}
Class<? extends View> clazz = null;

try {
Trace.traceBegin(Trace.TRACE_TAG_VIEW, name);

//3. 如果构造器为null
if (constructor == null) {
//4. 默认是android.view.作为前缀
//而之前我们说到的PhoneLayoutInflater前缀包含3个
// "android.widget."
// "android.webkit."
// "android.app." 所以,你懂的
clazz = mContext.getClassLoader().loadClass(
prefix != null ? (prefix + name) : name).asSubclass(View.class);

//5. 过滤一些不需要加载的View,比如RemoteView等
if (mFilter != null && clazz != null) {
boolean allowed = mFilter.onLoadClass(clazz);
if (!allowed) {
failNotAllowed(name, prefix, attrs);
}
}
constructor = clazz.getConstructor(mConstructorSignature);
constructor.setAccessible(true);
sConstructorMap.put(name, constructor);
} else {

//6. 记录是否被允许加载
if (mFilter != null) {
// Have we seen this name before?
Boolean allowedState = mFilterMap.get(name);
if (allowedState == null) {
// New class -- remember whether it is allowed
clazz = mContext.getClassLoader().loadClass(
prefix != null ? (prefix + name) : name).asSubclass(View.class);

boolean allowed = clazz != null && mFilter.onLoadClass(clazz);
mFilterMap.put(name, allowed);
if (!allowed) {
failNotAllowed(name, prefix, attrs);
}
} else if (allowedState.equals(Boolean.FALSE)) {
failNotAllowed(name, prefix, attrs);
}
}
}

Object[] args = mConstructorArgs;
args[1] = attrs;

//7. 反射构建View
final View view = constructor.newInstance(args);
if (view instanceof ViewStub) {
// Use the same context when inflating ViewStub later.
final ViewStub viewStub = (ViewStub) view;
viewStub.setLayoutInflater(cloneInContext((Context) args[0]));
}
return view;

} catch (NoSuchMethodException e) {
//...
} catch (ClassCastException e) {
//...
} catch (ClassNotFoundException e) {
//...
} catch (Exception e) {
//...
} finally {
Trace.traceEnd(Trace.TRACE_TAG_VIEW);
}
}

上述代码可知,LayoutInflater内存缓存了构造器,过滤部分tag后通过类名反射View对象。
其中4处给我们的启示是,实际上系统PhoneLayoutInflater只是扩展了类名的路径,让LayoutInflater识别更多的类而已。如果正真想要处理View定制样式,还是需要自定义LayoutInflater.Factory2

小结: 递归XML文件得到的标签名来转化成View的优先级为:mFactory2 > mFactory > mPrivateFactory > onCreateView。凭接全限定类名并经过剔除筛选后反射得到View对象。

至此,android中XML文件如何转化为View对象的流程已完整走通。
希望该文章能对你有一点帮助。